Monday, December 12, 2011

Ho Ho Ho

As promised in my prior post, here is the other side of my banner:

I LOVE it... I used the Believe Paper kit and my AP Cricut cartridge to make it :)

 Close To My Heart has a great promotion starting in a few days, and I have been slowly but surely working on some Art to show it off.  Once the promotion goes live, I will share some of it with you!

You Can Create!
Julia

Wednesday, November 16, 2011

Merry Christmas

Today's card was based on one found here.

Here is what it looks like:
Here is my version:


It is a 4x4 card cut out of Holiday Red Cardstock.  The green paper is from the Believe paper kit.  I cut the ornament and overlay using the Art Philosophy Cricut Cartridge.  The sentiment is from A1115 A Holiday and is stamped in Cranberry ink .


The buttons were from my stash, and I do not know the manufacturer(s).


You Can Create!
Julia

Monday, November 14, 2011

Thanks Banner

I have been wanting a hutch on the entry wall of my house for the LONGEST time.  My Mother In Law (who is AWESOME)  found one for me a great price and it came to live with us this week.  I have been fussing with it and decorating it and decided I wanted to add a banner to it .  This is what I came up with!

This banner is made with the Dreamin' paper pack and the Cricut Art Philosophy Cartridge.  I cut each banner at 7 inches...

Here is close up of one banner:
I really LOVE the way it looks.  AND... I put CTMH 's Believe paper on the back for Christmas.  I will share that side with you soon...

You Can Create!
Julia

Saturday, November 12, 2011

Make A Wish

This masculine card was a "commission" :)  I was asked to make a card for Katie's teacher.  I am pretty sure he does not read my blog so it it safe to post a picture before it is given to him.

This 6 x 6 card features The Lucky paper kit using Bamboo, Colonial White and Outdoor Denim cardstocks.  I used the cork letters for the sentiment.

You Can Create!
Julia

Monday, October 31, 2011

Believe In Whooo You Are.

I work with someone who loves owls.  I couldn't wait to give this to her!
I have a collection of boxes that I just can't throw away 'cause I can do "something" with them.  I pulled out this box because it is perfect to hold 3 cookies.

 Here is what it looked like before:

I inked the edges with Cocoa Ink to knock the white down a bit.
Then I covered the faces of my box with Sunset card stock:
I used paper from Close To My Heart's Mischief paper pack. ( I think I need to buy one more since it won't be around next Halloween).  I used ribbon and stamped images from the Pair-a-Phrase stamp set to embellish.  I love the results.


I love the way this one came out and I hope its recipient LOVES is too!

You Can Create!
Julia

Saturday, October 29, 2011

Boo!

I couldn't help myself.  I loved the treat bag I made the other day so much that I had to make another.

 My favorite detail is the cheap plastic spider ring that I used to keep the bag close.  I cut the ring and then poked the newly created prongs in my holes.  Hold the bag together nicely!  Gonna do that trick again for sure!
 I made the flower with folded strips of paper  layered and held together with a black brad...

Yes, this is the Mischief paper kit... so versatile!

You Can Create!
Julia

Thursday, October 27, 2011

Wicked Halloween Treat Bag

I wanted to make a mini gift for a teacher's aid I share a room with.  I made it out of Close To My Heart's 6x6 Kraft Die-cut Cards.  I added 2 score lines, each of them 1 inch from the fold on the card.


When folded, the card looks like this from the side:

I used the Mischief Paper kit to decorate.  The sentiment is from the August SOTM: Wicked.

I think I am going to bake some cookies to put inside.   Maybe I will get some candy. I am just not sure yet.


You Can Create!
Julia


Sunday, October 23, 2011

How to fix a Studio J mistake

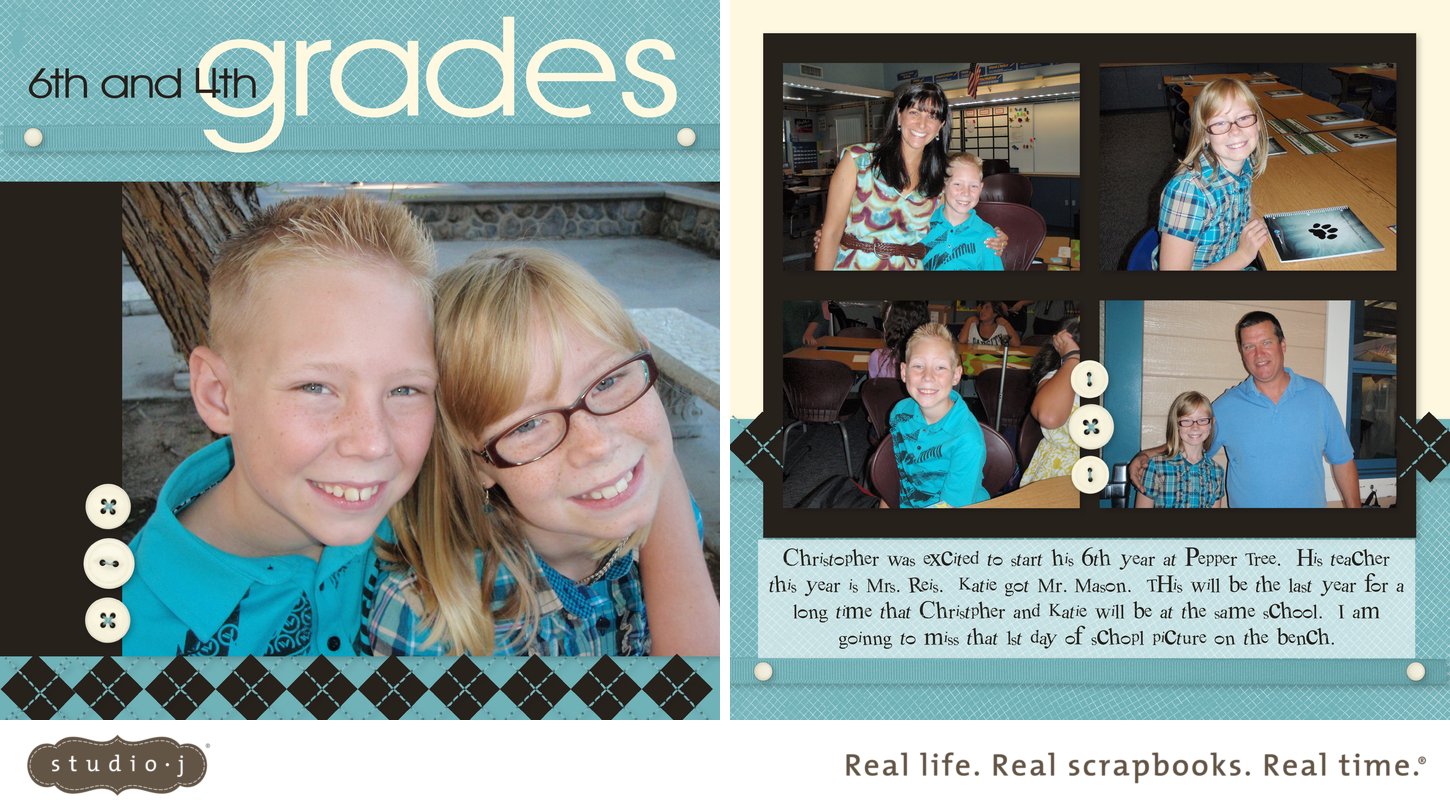
Carol Duvall said, "There are no mistakes, only opportunities to embellish".  We I have earned such an opportunity.  I had just returned from a weekend camping trip that involved a 16 mile canoe trip down the Colorado River and I was TIRED.  I should have know better than to approve my Studio J LO's in this state, but I had a deadline to meet.  Long story short I produced this BEAUTIFUL LO with 4 typo's!  UGH!

 So the first thing I had to do was "gut" the text box.  This may sound scary, but it is easier than you think.  When you look at your blade on your paper trimmer, it looks very much like this:
 I used the horizontal "point" on the blade to align where my cut would start and stop.  I used the notches along the vertical line that I wanted to cut.  I made 4 cuts and was able to remove the text box.  At first I was only going to remove the text box, but I noticed a difference in to colors between the Studio J Colonial White and my card stock, so I decided to remove ALL the Colonial White from this page.

I used my micro tip scissors to cut around the argyle pattern like so... using the paper trimmer for the rest of the cuts.
 When I was done with my cuts, I removed 4 areas of my LO:
That was easy :)  I simply mounted the "good" parts of my LO on to my Colonial White card stock.  All I have to do now is hand write the text and I am good to go.   I am a bit tired... so I am going to wait so that I do not make a mistake :)


You Can Create,
Julia

Friday, October 21, 2011

Emerald Pools


Yes, I know.  You are worried that I have given up on classic scrapbooking.  Fear not, I LOVE classic scrapbooking, but I just don't always have time.  That is why online scrapbooking is ideal.  I get to record my family's life AND, I get to be creative all in a timely manner.  I will always make time to play with paper... and my computer :)


You Can Create!
Julia

Wednesday, October 19, 2011

Convention

I had so much fun at convention!  To be part of the excitement of product announcements and being among the first to see the new catalog is awesome.  Getting to meet with sidelines and re connect with uplines is fun too!  Through in Disneyland food and entertainment and it was a weekend to remember!  Next year I am going to Dallas :)

Monday, October 17, 2011

3rd stream Crossing

I love the Studio J technique used here in the lower 6 pictures.  That is one picture, enlarged and place 6 times to create the effect of one large photo.

You Can Create!
Julia

Saturday, October 15, 2011

The Narrows

Almost done with my summer 2010 Family camp layouts.  No fancy techniques on this LO.  However, I LOVE the larger pictures.   I would NEVER spend the extra money required to purchase an 8 x 10 photo. BUT,  if it is included in the price of my page... Heck YA!!!  :)

You Can Create,
Julia

Thursday, October 13, 2011

6th and 4th grade

I recently learned how to make argyle with Studio J... pretty easy. I can show you how...

Believe it or not, this is the 2nd time the kids teachers wore clothes that matched the kids.... NICE!

You Can Create

Tuesday, October 11, 2011

Wishing You A Wonderful...

Monochromatic cards are always so pretty.  This little cutie is made with Amethyst Card Stock.  I used the Art Philosophy cartridge and stamp set to finish it off.  Almost done with my Troop 202 auction cards :)

You Can Create!
Julia

Sunday, October 9, 2011

Celebrate * Happy Birthday

I have made a card  like this before.  I has a flap that opens up giving you TONS of room to write your personal thoughts.  I really like it for that reason.  I used CTMH Sophia paper kit.  I used to stamp sets to finish the card off.  One called Express Postage , the other is REAL OLD... Special Occasion Super Set... LOVE that cupcake :)

You Can Create!
Julia

Friday, October 7, 2011

A Happy Hello

It is hard to believe, but this is the same card sketch I used for the Happy Birthday Card I shared the other day!  This time the card is portrait instead of landscape and I stamped the cute little snowman from the Pair-a-phrase stamp set.  Once again I used a retired CTMH paper kit but it goes so well with the snowman, I could not resist!  I sure hope the person who wins all these cards in the  Troop 202 auction loves them!

You Can Create!
Julia

Wednesday, October 5, 2011

Happy Birthday Card

I have a few more Troop 202 auction cards to share with you.  This card is based on a sketch from the Wishes Book.  It is card 2 in the Greeting Card Workshop.  I used paper from a retired CTMH kit with Sweet Leaf card stock.  The stamps used are from D1408 A Little Everything.

You Can Create!
Julia

Monday, October 3, 2011

(untitled) Bryce Canyon

For my last of the Bryce Canyon LO's  I wanted to feature just my family.  For most of the hike, the scouts were ahead of us, so there is few opportunities to take family photos.  I snapped a few here and there.  My favorite is Katie walking with her daddy  ( lower left).

This is a Studio J layout  and I used the Lucky paper kits.

Saturday, October 1, 2011

Into Bryce

 More Studio J work.  For this LO I wanted to feature the sights of Bryce.  We were thrilled to be hiking into the canyon.  I used the Lucky kit again ( love that argyle!)

You Can Create!
Julia

Thursday, September 29, 2011

Scout Hike

Still loving Studio J.  Created this LO to showcase out hike into Bryce Canyon.

You Can Create!
Julia

Tuesday, September 27, 2011

Baby Girl Card

Yes... I am guilty as charged.  This is the girl version of the card I shared with you the other day.  So, it is a copy of a copy :)

The colors used on this card are Hollyhock, Baby Pink and Colonial White.  The images are from Close To My Heart's D1266 Baby Steps.

You Can Create!
Julia

Sunday, September 25, 2011

Baby Boy Card

I made this card for the troop 202 auction.   If it looks familiar to you, it should.  I copied a card I did before!  For this card I used Bamboo and Twilight inks.  The images are stamped on Colonial White and (GASP!!!) cut out by hand... ( The way they USED to do it in the OLD days).  I based the whole color scheme of this card on the argyle ribbon ( retired Close To My Heart).

You Can Create!
Julia

Friday, September 23, 2011

Double Hearts

Here is another card I created for the Troop 202 Auction.  I love the Black/Colonial White/ Hollyhock paper combination.  I have tried to make blank cards with out sentiments so that they are versatile.

You Can Create,
Julia

Wednesday, September 21, 2011

Congratulations on your New Baby (girl version)

So here is the girl version of my Congratulations card.  My favorite part of this card is the mini safety pin on the bow.  This card was made from a retired CTMH kit called More To Adore.  I LOVE this kit and I am down to a few scraps.  The sentiment is stamped from the sentiment set on the Art Philosophy Cricut cartridge.  The colors used on this card are Hollyhock and chocolate.

You Can Create!
Juila

Monday, September 19, 2011

Congratulations on your New Baby ( boy version)

My son's scout troop has an annual auction as a fundraiser.  I have decided to donate a set of handmade cards.  So, I have been creating cards.


I used paper from a retired CTMH kit called Free Sprit.  The stamp image is from the Art Philosophy Cricut Bundle Sentiment stamp.

I made girl version of the card and will share that with you soon!

You Can Create!

Julia

Saturday, September 17, 2011

Christopher at Camp

So I shared with you that I introduced both my children to Studio J.  As they are growing they are attending more and more events without me, so I am slowing trying to get them to journal their own pages.  This is my son's page with his own journaling.  I'd love to have him do more in the future.


One neat technique he used for this LO was in pictures of the two boys on the left hand page.  This is actually the same picture...

First of all, the space between the boys makes this an awkward photo to use.  But, in Studio J Christopher was able in enlarge and crop the photo in such a way that both are the focal point of their own picture.  Love it.

You Can Create!
Julia

Thursday, September 15, 2011

Katie Skates

I found Studio J so easy to use that I thought I'd let my kids give it a go.  I gave them a very basic introduction on they were on their way. So this is my 9 year olds first Studio J LO.  It won't be her last because she really liked working on it..


You Can Create!
Julia

Tuesday, September 13, 2011

More Angels Landing

I used the Dreamin' paperpack for this LO too!  I had a few more pictures of our Angles Landing hike that I wanted to scrap.  I modified the "Conclusion Combo" design from the Imagine Idea book.  The sketch in the book called for  12 photos, but as you can see I used only 8.

You Can Create!
Julia

Sunday, September 11, 2011

Who Dat?

     I make cookie cutter kids.  Even though they are 2 years apart in age, I am constantly asked if they are twins.  The other day the kids were being silly and started taking pictures in the same outfit.  They wanted to know if anyone could tell them apart.
     I used the Dreamin' paper kit.   I think it is my current favorite paper kit.  I followed the "One-Way Mirror" layout from Magic.  I replaced a journal box with a photo and substituted 2 photos in the place of one 5x7 photo.  And, by the way, the title was cut with the Art Philosophy Cartridge. I love the LO and so do my kids. 


You Can Create!
 Julia

Friday, September 9, 2011

Happy Birthday Pillow Box

Can anyone tell me why these are called pill boxes?  I really don't know!   I learned today that these are called PILLOW Boxes!  That sure make a WHOLE lot more sense!  Love me a PILLOW box :)

Anyway, while on my box quest, my son noted that I had not made a birthday themed box so I set out to do so with my last box!


 Once again I cut the box as large as possible.  This time in Outdoor Denim.  I added a strip of star paper from the You Rock paper pack.  The stars and the swirls where also cut using the AP cartridge.

That is the last of my boxes...

Not sure what my next quest will be.  I have been looking at all the cool card options and may explore more of them next :)

You Can Create!
Julia

Wednesday, September 7, 2011

Take Out Box

The box quest continues :)

This time I tried the Take Out Box.

  • The box is cut in Colonial White to fill the whole sheet ( pushed the button and walked away so I did not catch the actual size!) ( AP index page 24)
  • The flower is cut in Colonial White at 2.75 inches (AP index page 29)  It is stamped in Tulip with a flower from D1491 ( Hooray Bouquet)
  • The  sentiment is cut in Colonial White at 1.25 (AP index page 36).  Then stamped the sentiment in Chocolate  using D1496 ( the stamp set in in the AP Cricut bundle)
  • The leaves are cut in Sweet Leaf at 2 inches ( AP index page 56).  I ran them through the crimping tool for texture.
I sponged the edges in Chocolate ink and added the brad to the sentiment... cute fast and easy!

You Can Create!
Julia

Theatre Is My Sport ( Love Sports Blog Hop)

Thank you for joining us for   The LOVE SPORTS BLOG HOP This is a blog hop featuring projects based on sports o...